Kit (no boom)
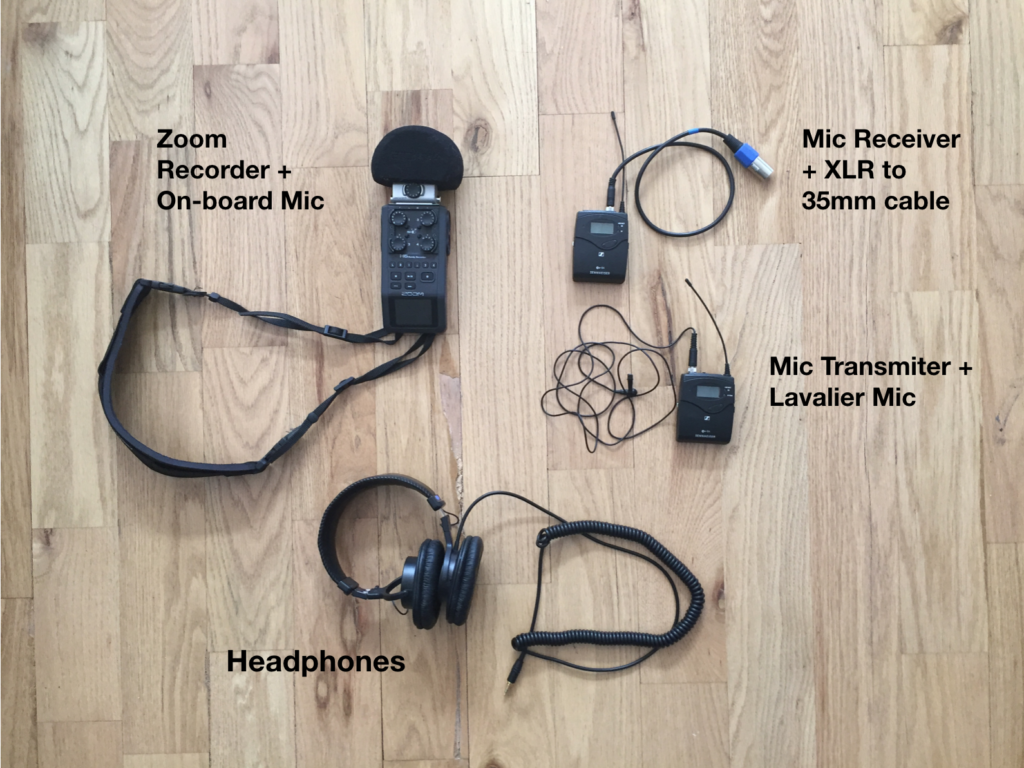
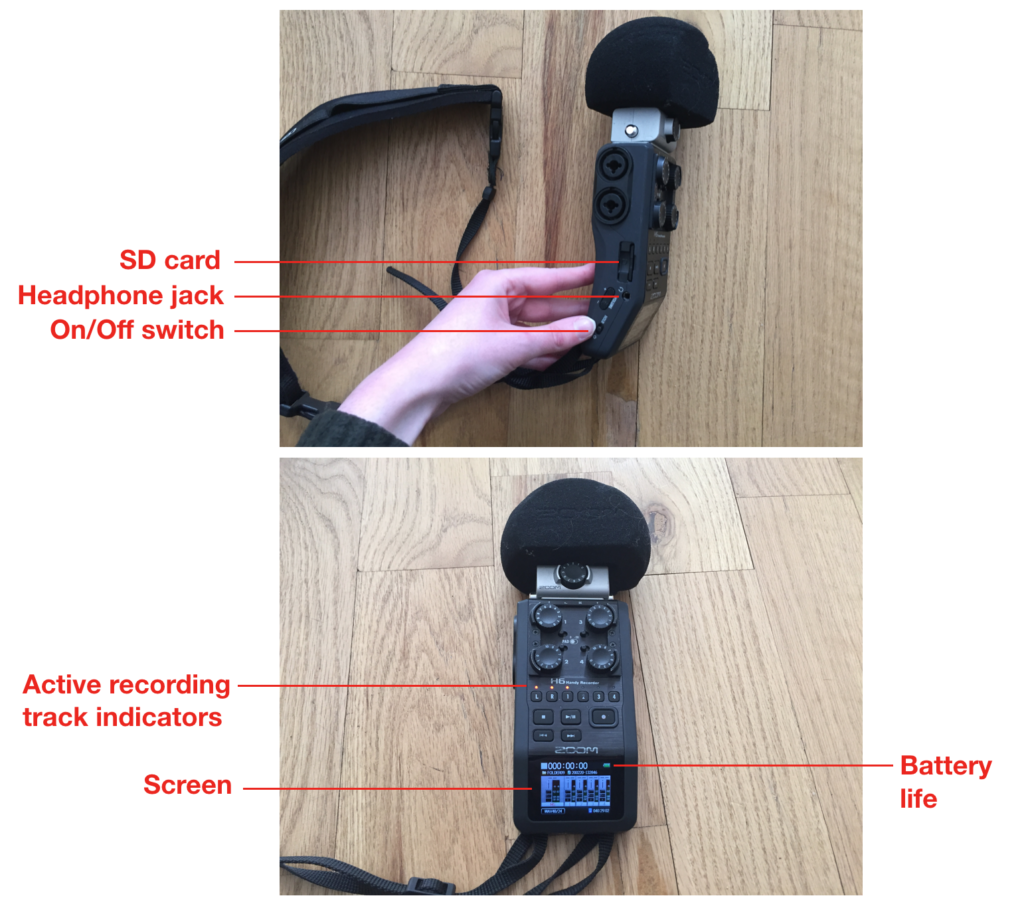
Step 1 – setting up Zoom Recorder
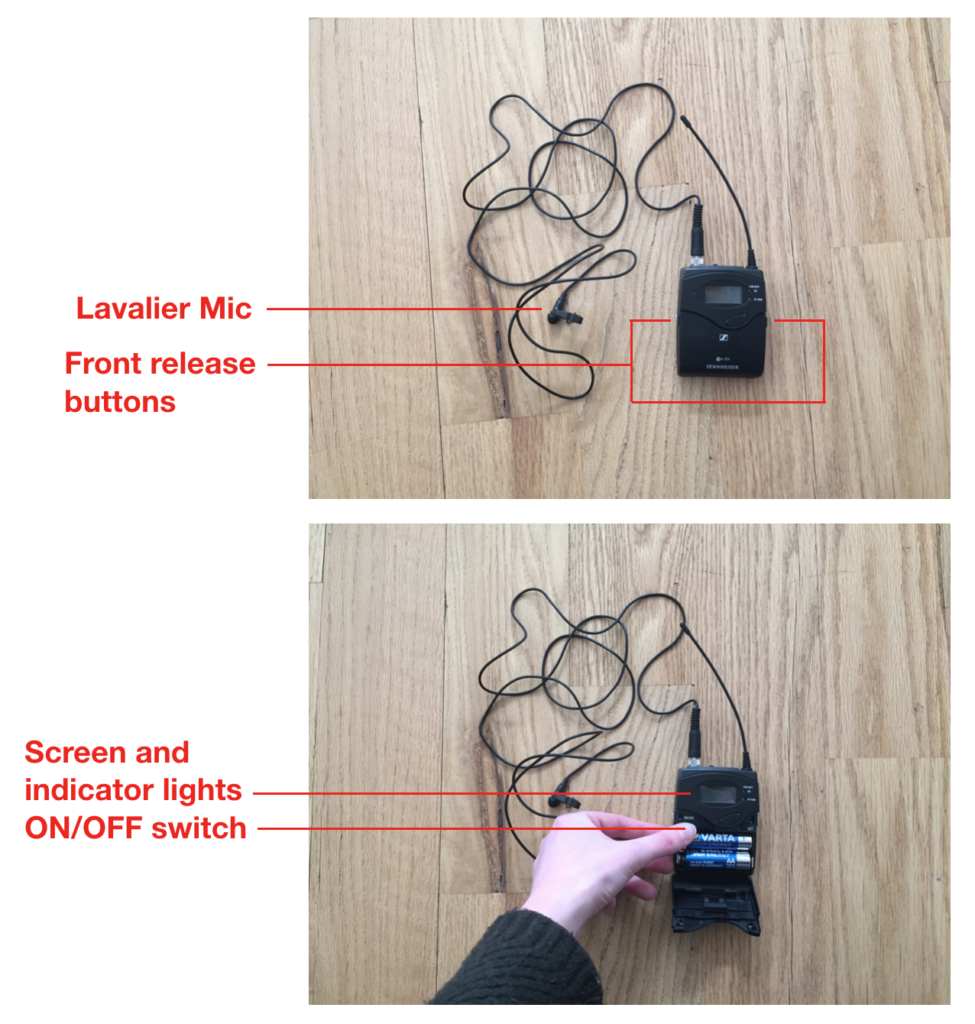
- The on/off switch is on the left side of the Zoom recorder. Slide down and release to turn on/off.
- Screen and active recording track indicators will illuminate when the Zoom is turned on
- The headphone jack and SD card slot are on the left side of the Zoom recorder. Check that an SD card is inserted in the Zoom.
- Press the menu button on the right side of the Zoom and navigate to where you can format the SD card. BE 100% SURE THAT THE CARD IS ALREADY BACKED UP SOMEWHERE BEFORE YOU DO THIS. If you are not sure, it’s best practice to back it up on to a computer or hard drive before you format the card in the Zoom, just to be safe.
- If battery replacement is needed, the battery slot is on the back of the recorder.
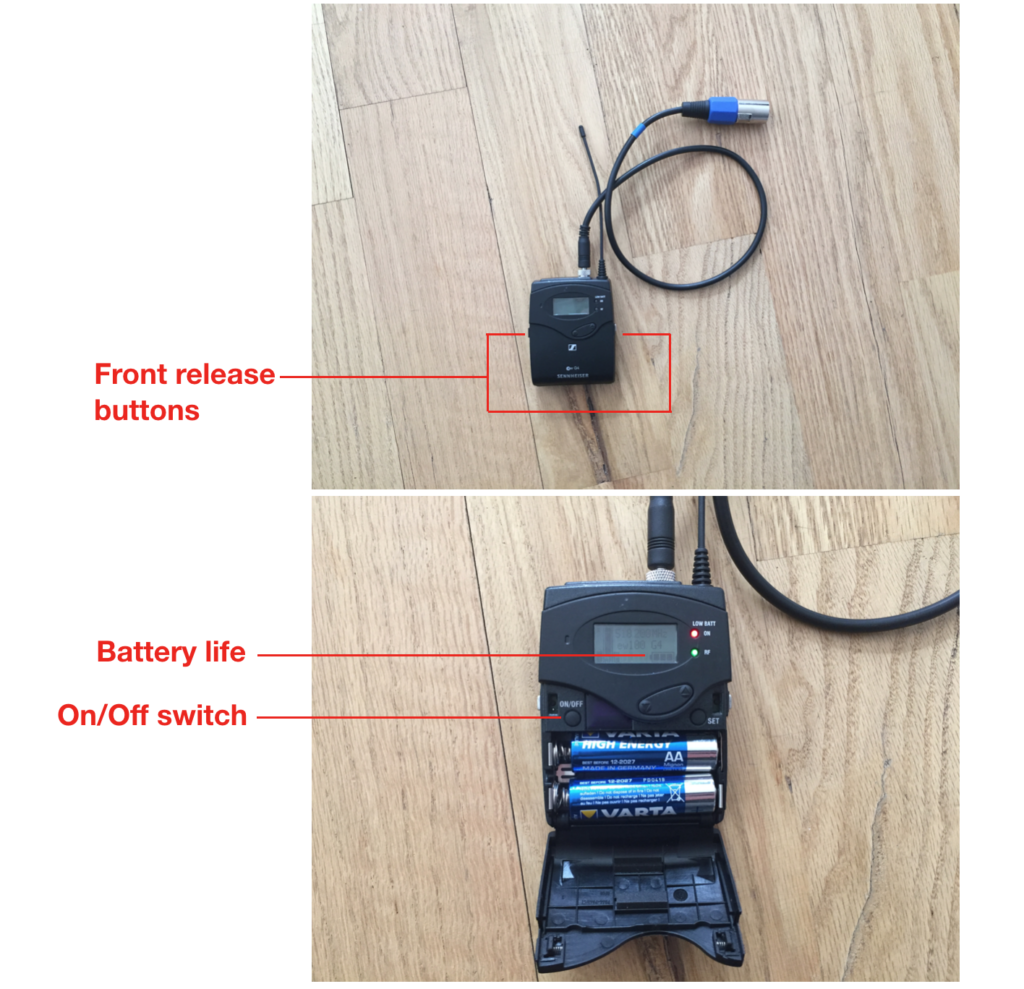
Step 2 – Lav Mic Receiver setup
- Offsite has two wireless lav mic sets. One is a G3 pair and the other is a G4 pair (noted on the text printed near the brand name on the front of both the receiver and transmitter packs). Make sure you are using the correct pair together when setting up
- The mic receiver pack and the mic transmitter pack look very similar to each other. The receiver pack is the one that DOES NOT say “Mic In” next to the audio cable jack on the top.
- Insert 35mm to XLR cable into the cable jack at the top of the receiver pack and twist the spinny bit to lock it in.
- Hold the front release buttons and flip open front of the receiver pack.
- Press and release ON/OFF switch to turn on the pack. Screen and indicator lights will illuminate.
- Settings should be all set, no need to change anything.
- Replace batteries if needed.
- Close the front of the pack.
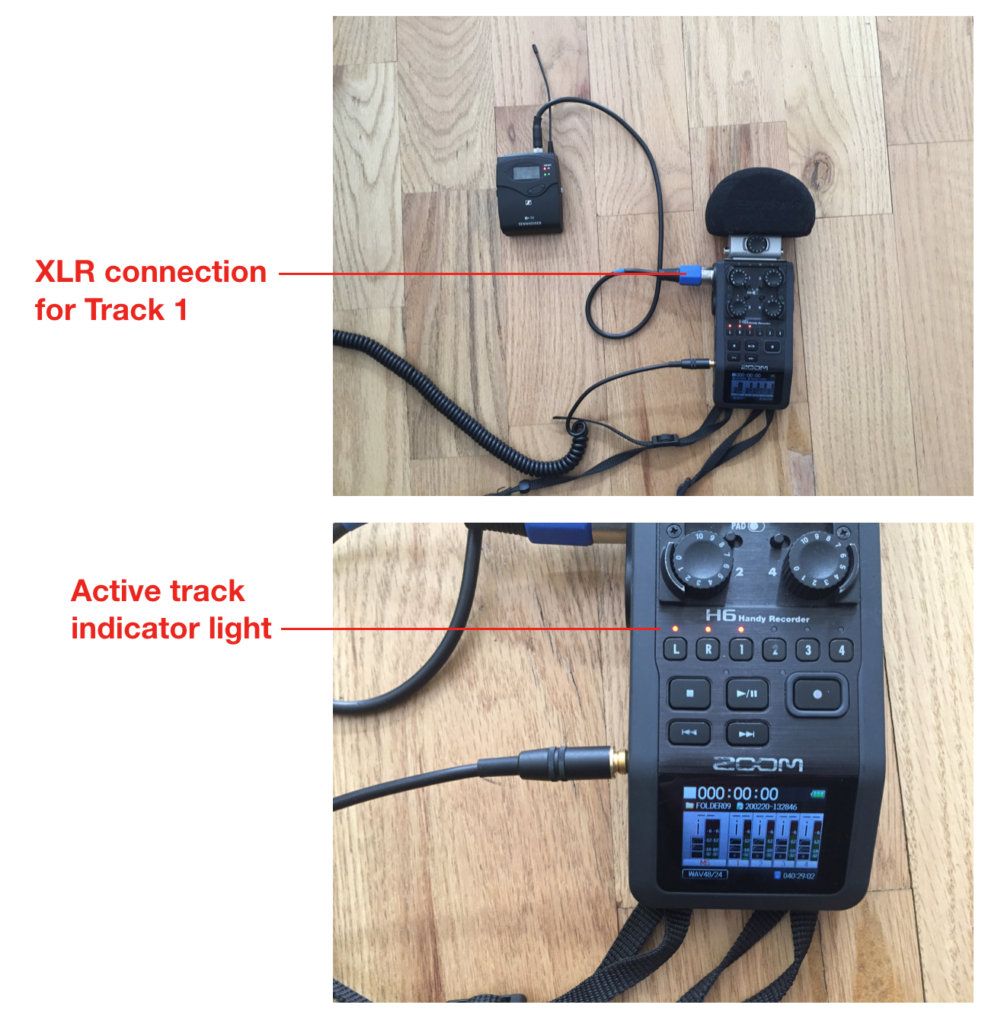
Step 3 – Attaching Lav Receiver to Zoom Recorder
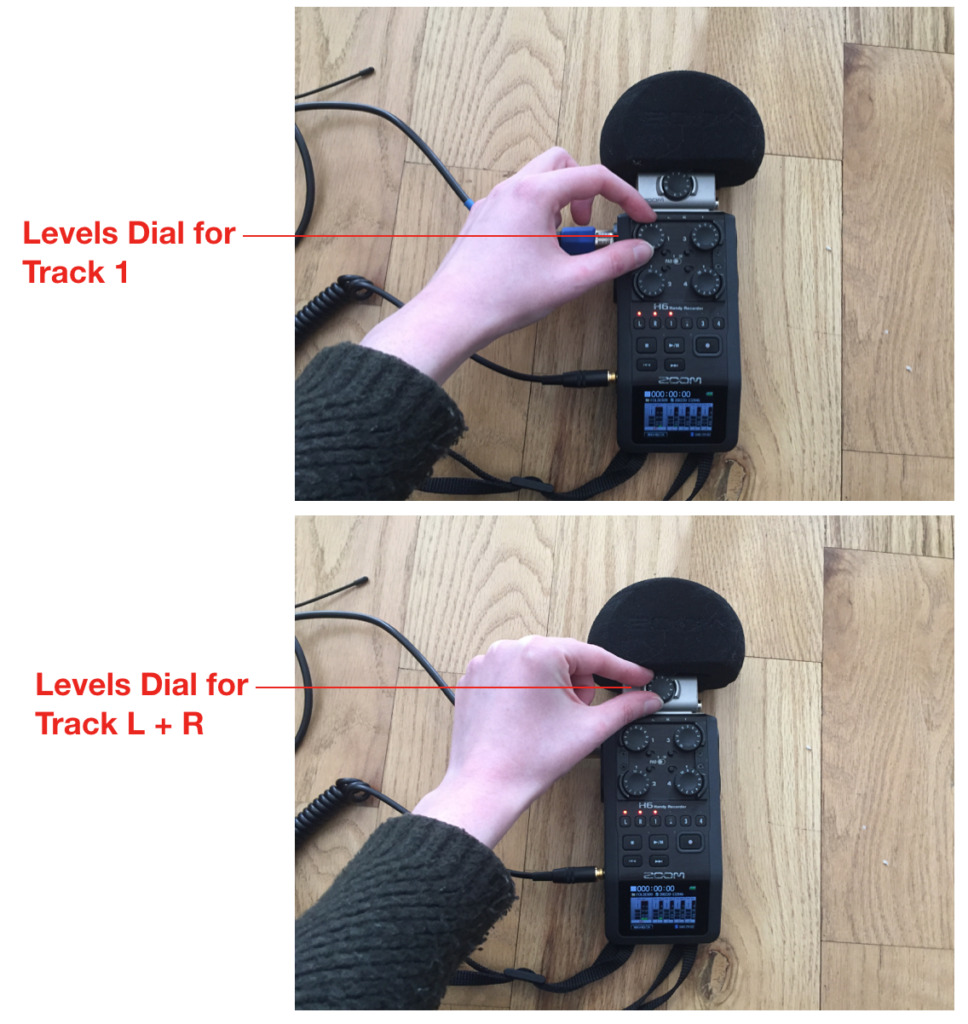
- In the setup in the photos we are using 2 tracks:
- Track 1 – Mic Receiver for wireless lav mic.
- Track L+R – Zoom on-board mic (this is attached to the top of the Zoom recorder)
- With our Zoom recorder, you can add up to 4 tracks besides the on-board mic.
- Plug pack XLR cable into the Track 1 slot of the Zoom recorder (upper left side).
- Active track indicator lights for Track 1 and Track L+R should be illuminated.
- If the correct tracks are not illuminated, simply press the button below the appropriate active track indicator light to turn the track on or off.
- Make sure any tracks you are not using are turned off.
Step 4 – Lav Mic Transmitter Setup
- Offsite has two wireless lav mic sets. One is a G3 pair and the other is a G4 pair (noted on the text printed near the brand name on the front of both the receiver and transmitter packs). Make sure you are using the correct pair together when setting up
- The mic receiver pack and the mic transmitter pack look very similar to each other. The transmitter pack is the one that says “Mic In” next to the audio cable jack on the top.
- Insert 35mm lav mic cable into the cable jack at the top of the transmitter pack and twist the spinny bit to lock it in.
- Hold the front release buttons and flip open front of the transmitter pack.
- Press and release ON/OFF switch to turn on the pack. Screen and indicator lights will illuminate.
- Settings should be all set, no need to change anything.
- Replace batteries if needed
- Close the front of the pack
Step 5A – Placement of lav mic
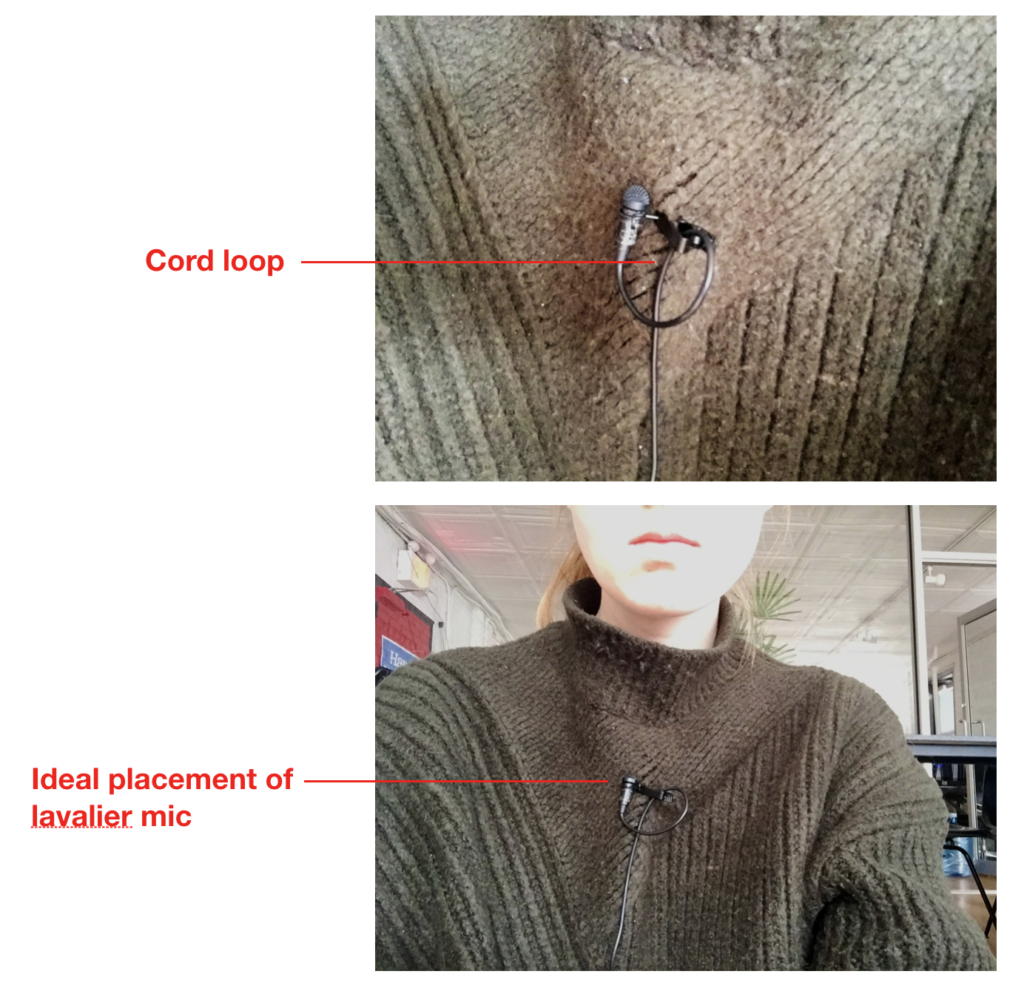
- Ideally the mic cord should loop through the clip attached to the subject’s clothing, but should not be pinched between the “jaws” of the clip. It is loosely looped through the widest part of the clip.
- Attach the lav mic to the front of the subject’s clothing.
- The ideal placement for the mic is directly above the sternum without any loose clothing, scarves or jewelry covering or near the mic.
- When recording video with audio, attach the mic to the inside of the top layer of clothing so the cord and mic are not visible on camera.
- In some cases, the material or cut of someones clothing will not be conducive for attaching the mic with a mic clip. In this case, there are double-sided stickies and fuzzy lav mic covers in our kit that can be used to stick the mic to the inside of someone’s clothing (or directly to their skin if necessary).
- Sandwich the mic between one of the stickies and one of the fuzzies and make sure everything is stuck together. Then remove the plastic from the side of the sticky facing away from the mic and adhere it to the inside of the subject’s clothing directly above their sternum.
Step 5B – Placement of On-board mic
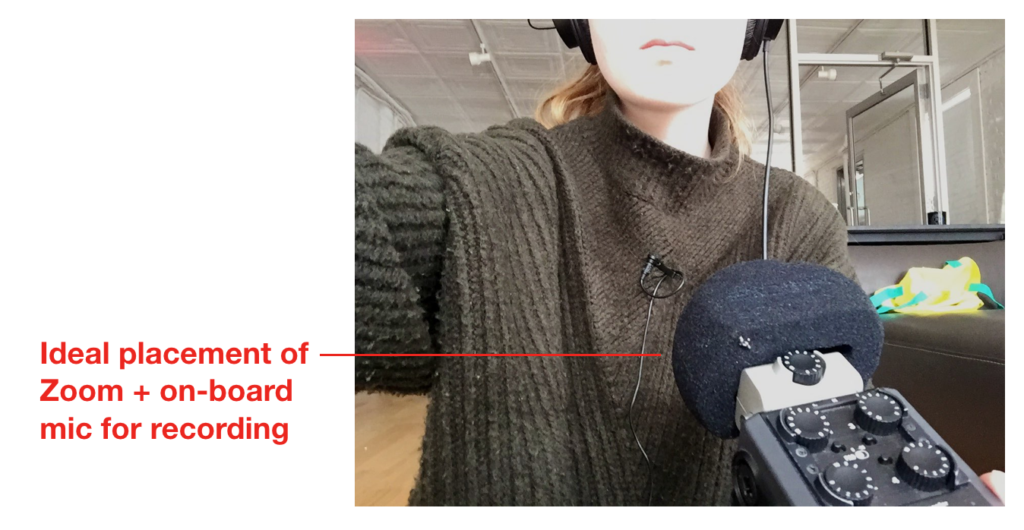
- The best placement for recording audio with the Zoom’s on-board mic is about 1 to 2 feet away from the subject, pointed towards their Adam’s apple.
- If recording with video, get as close to this position as possible while keeping the mic from being visible in the frame.
- Avoid having the mic directly in front of the subject’s mouth, as the air coming out as they speak will cause unwanted “popping” sounds in the audio recording.
- When using the on-board mic, once you have the Zoom + on-board mic in position, DO NOT TOUCH or move the recorder while recording to avoid unwanted audio feedback in the recording.
Step 5C – placement of Boom Mic
- Hold the boom pole as horizontal as possible to avoid cutting in to the corners of the video frame.
- From just in front of and above the subject’s face, point the boom mic towards the subject’s sternum, keeping the mic as close to the speaker as possible while still avoiding being visible in the video frame.
- After the video frame is set but before rolling, ask the DP to tell you when you’re in the shot so you can gage how close you can get.
- On long takes, brace one arm on your side or hip or other part of your body to keep yourself from getting tired quickly.
- Move the boom pole as little as possible during a take to avoid unwanted audio feedback in the recording.
Step 6 – Listen for unwanted background noise
- Before and after setting levels (see step 7), as well as during the recording, listen through the headphones and determine if there is any background noise you can eliminate from your recording.
- If possible, turn off, silence or have the shoot move away from:
- TVs or videos
- Background music or radio
- Appliances like fans, radiators, heaters, aircon, ticking clocks and watches, and refrigerators
- Loud street or construction noise, even if you are inside and near windows
- Other people (or yourself!) in your recording space – talking, typing, phones, jewelry clinking, etc.
- Loud footsteps or noises coming from spaces above, below or adjacent to your recording space.
- If there are intermittent noises you cannot control (like construction noise or footsteps above you) try to wait for breaks in those to shoot/record.
- If any noises start up in the middle of a take while shooting, as soon as possible when an appropriate natural break in the take happens, call it out to the director and/or producers on set so they know they have to do the take again if they want clean audio.
- If the noise is bad enough that it will ruin the entire take, try to get the director or producer’s attention without disrupting the take so they can make a decision as to whether they would like to cut or not.
Step 7 – Check audio levels
- Check your audio levels before starting to record to ensure you are getting the best quality audio.
- With all mics in their final position, have the subject speak as they normally would during a recording, not any softer or louder.
- The “peak” or maximum audio level when the speaker is at their loudest should hit between -6 and -12 on the audio track levels.
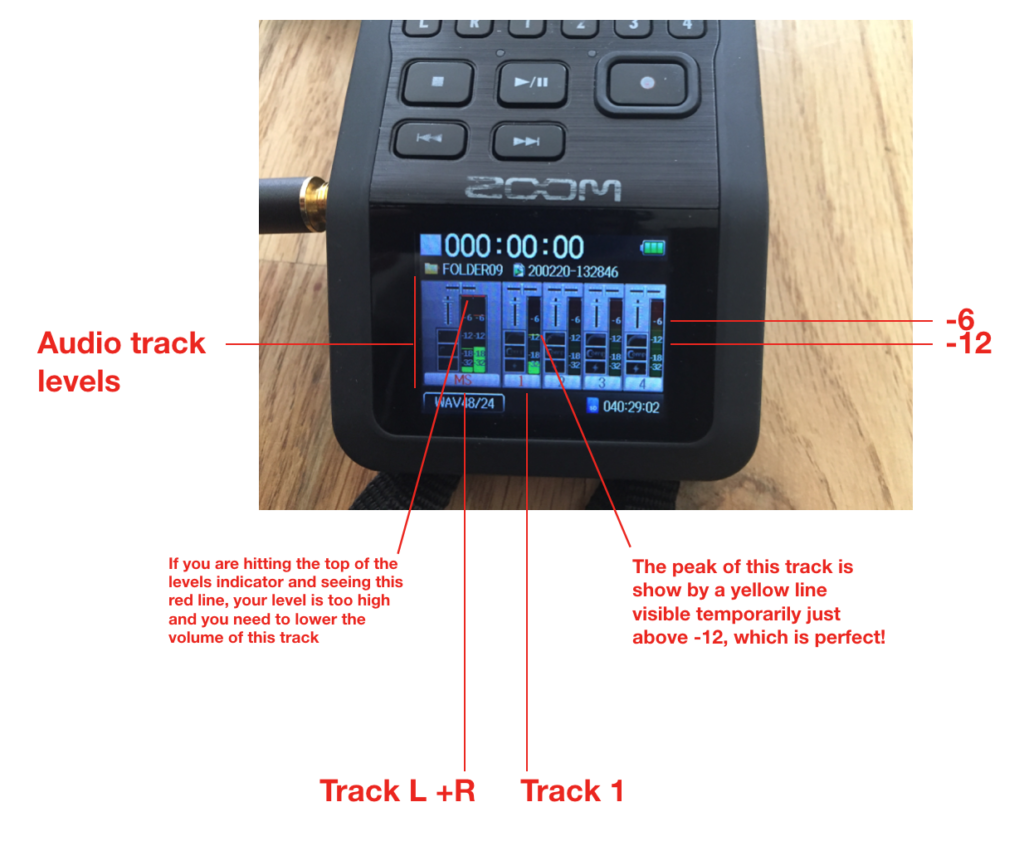
- If one or both of your tracks are too loud or too quiet, you can adjust the level by turning the dial for the appropriate track on the Zoom recorder.
- The dial goes from 1 to 10, with 1 being the most quiet and 10 being the loudest.
- Have the speaker continue talking as they normally would while you rotate the dial until you reach the ideal peak level between -6 and -12 on the levels indicator.
- Monitor the audio levels during the recording and adjust in small amounts during pauses in the audio if the speaker gets too loud or too quiet
Step 8 – Recording audio!
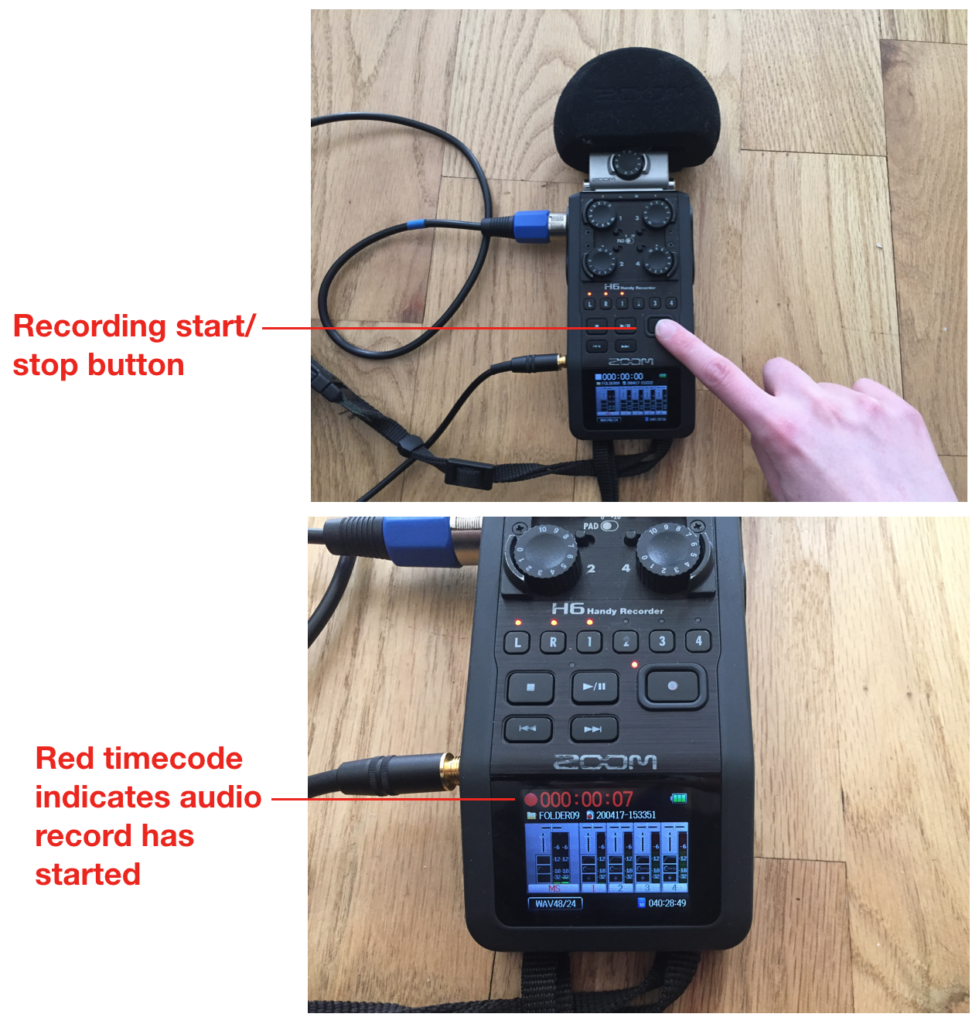
- When you are fully set up and ready to record, quickly press and release the large recording start/stop button on the front of the Zoom recorder to begin recording audio.
- When recording, the time code at the top of the screen will turn red and begin counting up from when you started.
- When recording video with audio:
- After the DP calls out “Camera rolling”, make sure you have started the audio recording and then call out “Sound speed”
- Use a clapboard or have the subject clap once with their hands visible in the video frame so we can sync the video and audio in post.
- Once the director cuts and you are completely sure you have all the audio you need, press the recording start/stop button once more to stop recording. The time code at the top of the screen will stop counting up, turn from red to white, and reset to zero.
Step 9 – wrapping up
- When you have finished recording, turn off the Zoom recorder, mic receiver and mic transmitter (using the same button you used to turn them all on) and disassemble the kit into its separate parts.
- Wrap all cables into loose loops without kinks and put them away in a way that will keep them from being bent.
- Eject the SD card from the left side of the Zoom recorder by pressing down on the card and releasing it so it pops out. After transferring the files to your computer or hard drive and making sure everything is backed up, re-insert the SD card into the zoom recorder using the same technique, so the recorder is ready for future use.