OCIO is a color management system invented by Sony Imageworks, that has been adopted in *all* post-production studios. On top of everything, OCIO allows to work with ACES, which is the Academy (the association that give the oscars) official color pipeline, required for tv and film work. Also see Aces Overview.
Working in c4D with ACES
Setup + Installation
- Download OCIO Config
- InC4D Render Settings > Arnold Renderer > Color manager select the aces 1.0.3 config.ocio
- sRGB color space (narrow).. default color space: Utility – sRGB – Texture
- Render Color space: ACES – ACEScg
- IPR Window > View > Toolbar > Show Color Space List (then choose Output sRGB)
- Set Image textures:
- Utility: Raw (data)
- Utility Linear sRGB (HDRI)
- Utility sRGB Texture
Using ACES in c4d Projects
- HDRI color space should be Utility – Linear – sRGB
- Bump maps changed to Utility – Linear – sRGB
- Textures should be Utility – sRGB
Processing Linear Images
Rendering linear images as 32 bit EXR or TIFF must be processed in Photoshop, After Effects or Fusion.
To convert EXRs in Photoshop, you must install the OpenColorIO plugin AND the OCIO.config folders for Blender or C4D/ACES.
Download these sample render for testing. If your setup is correct, the processed EXR should look identical to the PNG: PNG + EXR <— are these just for blender? Need c4d…
Setup + Installation
Download + Install the OpenColorIO plugin for Photoshop
- Click the link for ‘Mac’ download on this page.
- Move the plugin to the Photoshop folder (Applications > Adobe Photoshop > Plugins)
Allow permissions in System Preferences - Restart Photoshop and find the plugin under filters
Install Blender OCIO config
- Copy Blender OCIO config
- In the finder, select Blender in Applications folder, right click to Show Package Contents
- Navigate to Blender > Contents > Resources > 2.82 > datafiles > colormanagement
- Copy to the colormanagement folder to Macintosh HD > Library > Application Support > OpenColorIO (make folder if there isn’t one)
- Rename folder to Blender Filmic colormanagement edited
- Inside of this folder, open config.ocio in text edit
- Delete these two lines:
# CIE XYZ color space
XYZ: XYZ - You will now see this option in the Photoshop OpenColorIO plugin
Install ACES OCIO config
- Download OCIO Config Files
- Move aces_1.0.3 folder to Macintosh HD > Library > Application Support > OpenColorIO (make folder if there isn’t one)
- You will now see this option in the Photoshop OpenColorIO plugin
Processing Blender Filmic Exrs
Sample Blender Render for testing: PNG + EXR
Photoshop
With OpenColorIO Installed…
- Open the EXR with default settings in Photoshop
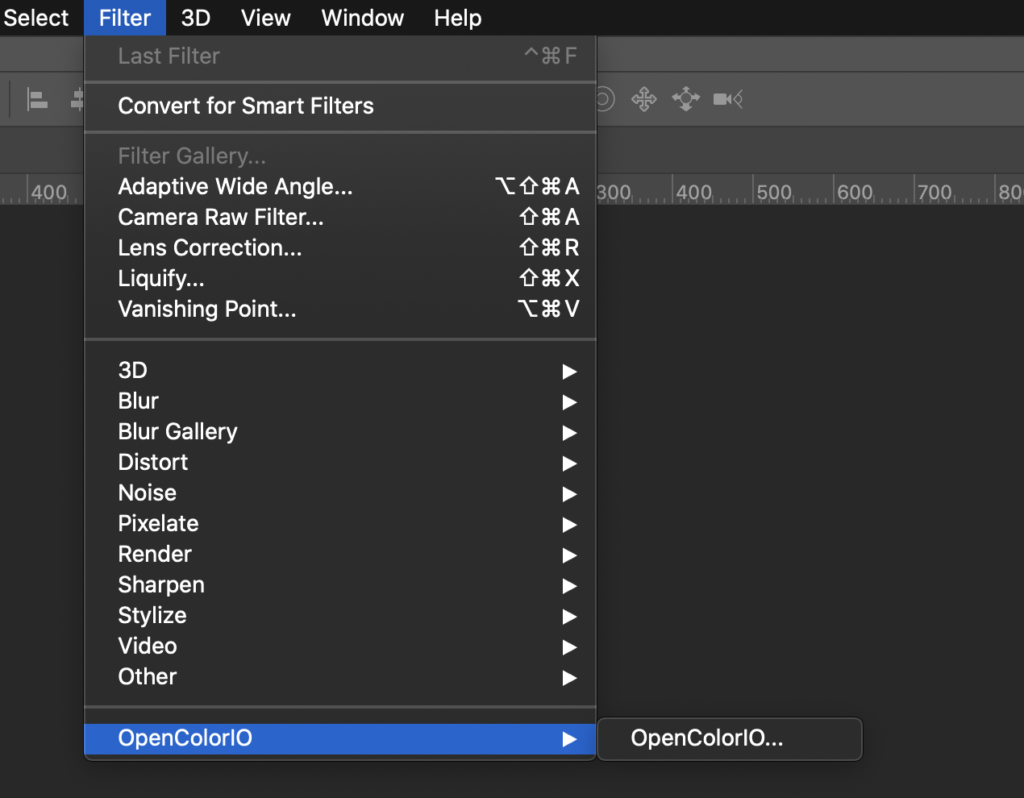
- Convert with OpenColorIO Plugin
- Filters > OpenColorIO
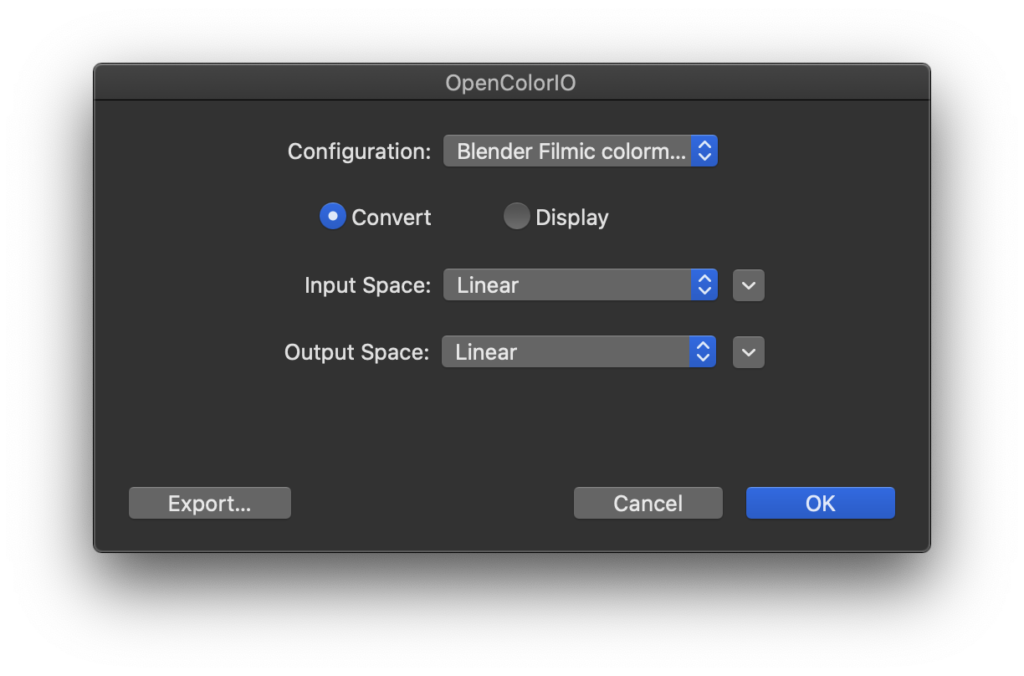
- Select Blender Filmic colormanagement edited
- Input Space: Linear
- Output Space: Filmic sRGB
- ‘OK’
- Convert AGAIN with OpenColorIO Plugin
- Filters > OpenColorIO
- Select Blender Filmic colormanagement edited
- Input Space: sRGB
- Output Space: Linear
- ‘OK’
- Convert to 16 bits
- Image > Mode > 16 bits
- Method: Exposure + Gamma = 0 / 1
- The viewable image should not change in appearance.
Fusion
- In a fusion clip with a Blender EXR file, add a OCIO Colorspace (OCC) node
- Locate the OCIO Config from Blender (see above to find the config)
- Source Space: Linear
- Output Space: sRGB
Processing C4D/ACES Exrs
Photoshop
Option A – Using OpenColorIO
With OpenColorIO plugin installed (see above for installation instructions)…
- Open the EXR in Photoshop and select Filter > OpenColorIO
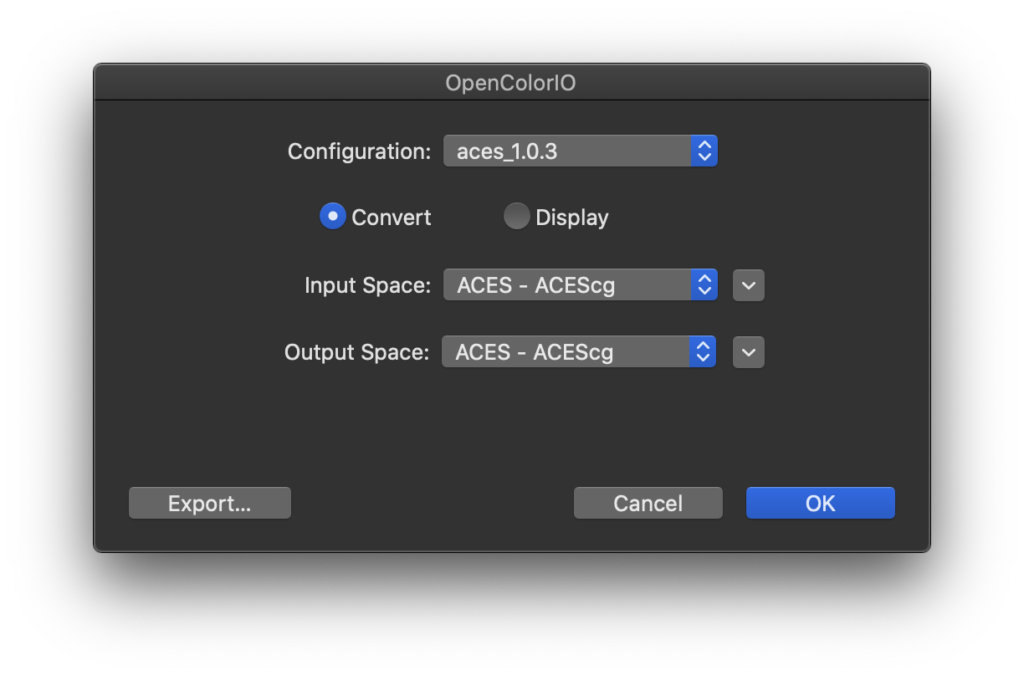
Configuration: ACES_1.0.3
Input Space: ACES – ACEScg
Output Space: Output – sRGB - Go back into Filter > OpenColorIO and set another round of inputs/outputs:
Configuration: ACES_1.0.3
Input Space: Input – Generic – sRGB – Texture
Output Space: Unity – Linear – sRGB- Alternate Step: Instead of processing again with OpenColorIO, you can change Levels > change midpoint to .45 (“to undo the srgb icc profile of Photoshop”)
- TO DO: Upload Test EXR and JPG to use when configuring to make sure this process is correct when setting up
- Convert to 16 bit
- Image > Mode > 16 bits
- Method: Exposure + Gamma = 0 / 1
- The viewable image should not change in appearance.
Option B – LUT
- Open an ACEScg exr in photoshop
- Edit -> Assign Profile -> “ACES CG Linear (Academy Color Encoding System AP1)”
- Layer -> New Adjustment Layer -> Color Lookup -> Load 3D LUT
- Navigate to ACEScg_Photoshop_SceneLinear_to_DisplayLinear_Transform_DimSurround.csp
- You should now be viewing your ACEScg file correctly in Photoshop.
Basically, what’s going on here is the LUT takes the ACEScg scene linear data, and passes it through the RRT, and through most of a standard 48nit ODT, but stops around line 99 after the Dim Surround compensation has been applied.
At this point, you now have display linear AP1 data, all of the picture rendering has been applied, we’re just not transforming for any specific display. Instead we hand off back to Photoshop’s normal ICC based colour management, which deals with transforming from AP1 down to sRGB (or whatever your display primaries are), and applying the EOTF.
You can use this to save out display referred images directly. For example, the file SonyF35.StillLife_sRGB_via_Photoshop.png was exported using the Export -> Quick Export as PNG, and provides a clean match to the same image exported from Nuke using the Output – sRGB.
Or you can do work in Photoshop, then just disable the Color Lookup layer when you’re ready to save out your work as an ACEScg EXR again.
https://community.acescentral.com/t/aces-photoshop-friendly-workflows/1369/30
Fusion
Choose either built in ACES node, or the OCIO aces config, they both do the same thing.
To Do
- Research sRBG vs R709, P3, rec2020 and when sRGB is the wrong choice.
References
Use Blender Filmic inside Photoshop
AcesCentral Article
PureNukeAces (Photoshop ACES Lut download)